Unfortunately, predicting potential threats or having a foolproof plan for logging anomalies isn’t quite feasible in practice.
That’s why it’s standard to rely on additional tools to simulate potential scenarios, using different tools to build systems that respond effectively. Regarding security, detecting Active Directory attacks with SIEM serves as a prime example. Initially, we might not grasp how to detect each attack among the already collected log sets. Log formats may change, as might the log-collecting product. In essence, there could be many alterations from the sequence to the scope of the logs encountered.
In this context, we aim to explain which cases Active Directory is vulnerable to attack, and how to detect and prevent these attacks to chart a path forward. Through the environment we’ve established with Detection Lab, we’ll simulate attacks on AD and monitor them with Splunk. Before discussing further on attacks and security, it’s prudent to gather some preliminary information about Active Directory.
Active Directory (AD) is a directory service operating on Microsoft Windows Server. Its primary function is enabling administrators to manage permissions and control access to network resources. The Active Directory structure stands as one of the most crucial components of user management. In essence, Active Directory serves as a repository for network objects and user information, making it easy to access and manage this data.
Given that Microsoft Active Directory centrally authorizes users, access, and applications within an organization, it becomes a direct target for attackers. If a cyber attacker gains access to the Active Directory system, they potentially gain access to all connected user accounts, databases, applications, and any other information. Hence, attacks, particularly those not identified early on, can lead to challenging recovery situations.
In a landscape where attackers zero in on data and users, relying solely on a defense model rooted in network security falls short. Active Directory security becomes paramount, with organizations leaning on SIEM solutions for this purpose. SIEM solutions streamline report creation to meet standards and track all AD actions, allowing for the analysis of security breaches and the identification and prevention of potential attacks.
As known, tightening security around Active Directory management is vital and critical. A vulnerability or misconfiguration in a management system placed at the system’s core could lead to undesirable consequences. Enter Detection Lab, comprising four main components (Client, DC, Forwarder, and Splunk), proving to be an invaluable tool. Detection Lab, a collection of Packer and Vagrant scripts, includes endpoint security tools and logger applications facilitating the rapid setup of Windows Active Directory online.
To install Detection Lab in the Windows environment, you can use the link provided. Additionally, a “Troubleshooting” section is available to address any installation hiccups.
After simulating attacks in the Detection Lab environment, we’ll enhance our ability to monitor logs and categorize attacks according to Mitre IDs using the App and Add-ons we’ll install in Splunk. So, what exactly are these App and Add-ons?
Splunk stands as an outstanding log management and SIEM product handling big data, analyzing a large volume of machine logs. The process of normalizing and categorizing logs varies across different SIEM products. In Splunk, add-ons undertake this process, making sense of incoming raw data and normalizing it. On the other hand, apps are responsible for visualizing and enriching the interpreted data. Splunk offers many free Apps and Add-ons. To detect AD attacks, we can utilize the “ThreatHunting” and “Sysmon App for Splunk” applications available for free on the Splunkbase site. We’ll also leverage these two apps in our demo.
After discussing Detection Lab and Splunk App features, we can start the demo, utilizing attack vectors such as Atomic Red Team, Mimikatz, and PurpleSharp.
Following the Detection Lab installation, let’s boot up the DC, Client, and Splunk machines we require. As detailed in the provided link, you can use commands like “vagrant up logger” and “vagrant up dc” to start the service of the machines in Detection Lab. Should you need to remove or reconfigure any machine, the “vagrant destroy ” command may be used.

Before initiating the attack simulation, let’s install the agent, Universal Forwarder, on the server to transfer Sysmon, PowerShell, and Windows logs from DC to Splunk.
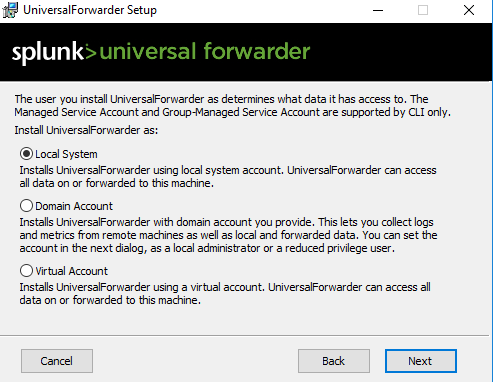
We need to run the Setup as Admin and proceed with the “Customize Options” option.
Given that we’ll be collecting logs from the event viewer, we can do so via the event viewer using either the authorized domain account or the “local system” user, both considered authorized.
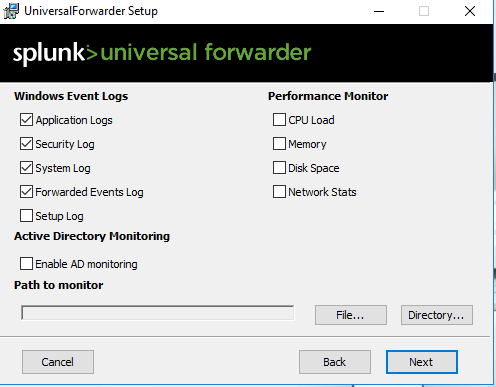
This stands as one of the crucial aspects when collecting Windows logs. If we fail to select any category, it won’t cause an issue. However, checking the Security checkbox, for instance, will result in the collection of logs from the fields mentioned above. Inputs.conf is then created in the “local” folder in the “etc > apps > Splunk Universal Forwarder” file, with configuration information written therein. When the Splunk agent service runs, it initially checks the “local” folder. Therefore, inputs.conf settings under local are paramount. After selecting the categories to collect the logs mentioned above, the installation concludes. Open “$SPLUNKHOME > etc > apps > SplunkUniversalForwarder > local > inputs.conf” file to configure it.
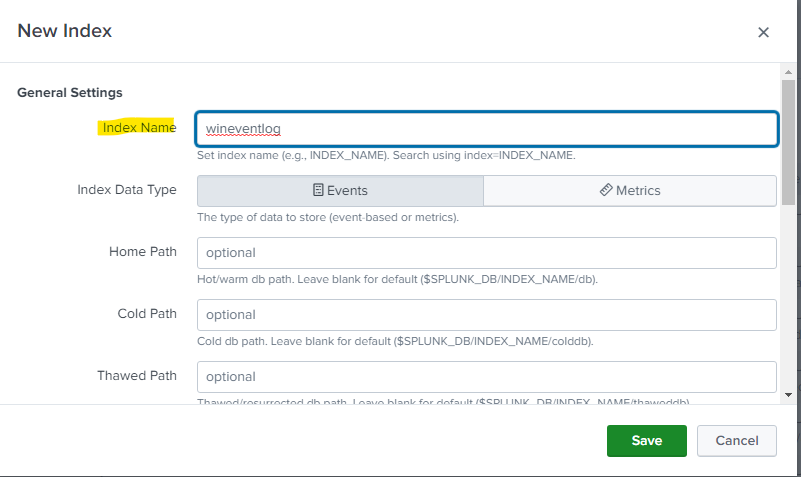
As we’ve already selected “Security, Application, System, and ForwardedEvents” during installation, inputs.conf is structured accordingly. Since Splunk searches and stores logs with index logic, only “index” should be defined in inputs.conf. Given that we aim to search Windows logs in Splunk with the “wineventlog” index, “index=wineventlog” should be written under all categories. Otherwise, the logs will go to the Splunk default index “main”.
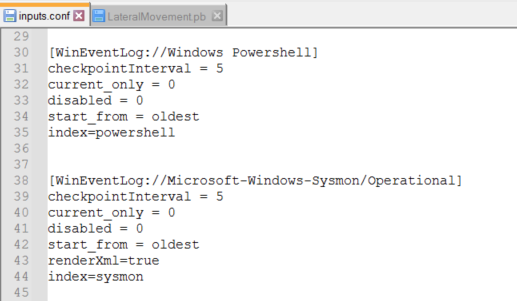
Certain categories are available during installation. However, numerous log files can be read on the event viewer. For instance, the file path for Sysmon is “Microsoft > Windows > Sysmon” to read the logs in Event Viewer. To read the logs in this file, the file path must be given in the “WinEventLog” tag.
After completing the configurations in Inputs.conf, the given index is created in Splunk GUI. The Universal Forwarder is then restarted.

After the Forwarder restarts, you can view Windows logs with the “index=wineventlog” search. Prior to these operations, however, the Windows Add-On should be downloaded for the normalization and categorization of logs.
Following the transfer of PowerShell, Sysmon, and Windows logs from the target server to Splunk, we can download apps enabling quick viewing and intervention in AD attacks.
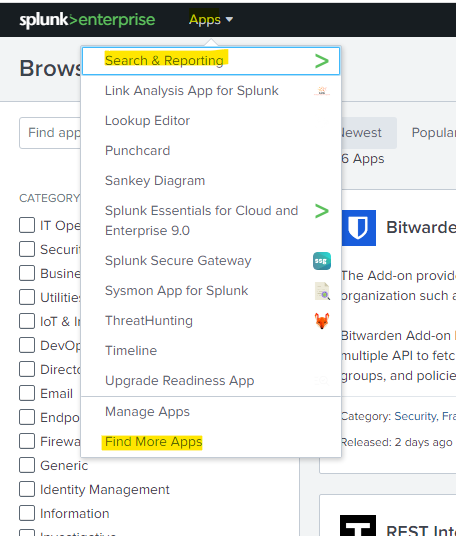
To download ThreatHunting and Sysmon apps, follow the “Apps > Find More Apps >” path.
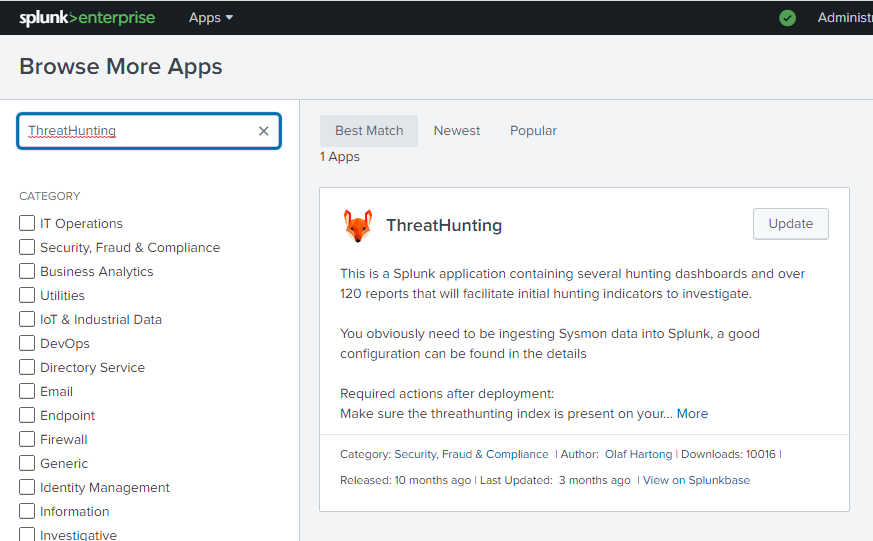
Enter the name of the relevant app in the search field and download it on Splunk. The same process applies to Sysmon.
After completing all these steps, we can now begin simulating AD attacks. Splunk monitors Active Directory and users in real-time.
Atomic Red Team serves as an open-source software allowing you to run attack tests developed in accordance with the Mitre ATT&CK Framework. Each test is designed to apply a specific technique, providing a highly suitable environment for blue team members to immediately test their defenses against a wide range of attacks.
Among the hundreds of techniques in Atomic Red Team, we’ll utilize T1033 (System Owner/User Discovery), T1136 (Create Account), T1074 (Data Staged), and T1086 (PowerShell).
The Atomic Red Team techniques are available in the “Tools” folder included in Detection Lab. We need to run the PowerShell application on this file path and import the PowerShell module and atomic path.
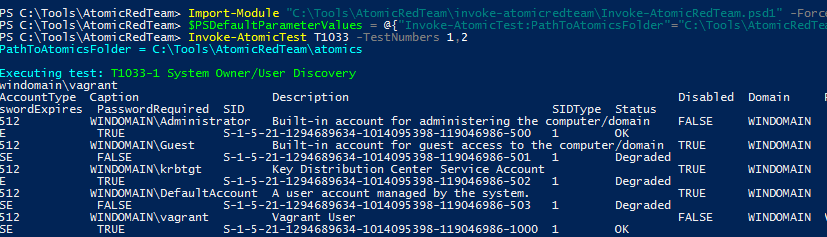
“Import-Module “C:\Tools\AtomicRedTeam\invoke-atomicredteam\invoke-AtomicRedTeam.psd1” -Force
$PSDefaultParameterValues = @{“Invoke-AtomicTest:PathToAtomicsFolder”=”C:\Tools\AtomicRedTeam\atomics”}”
“It suffices to import the module once. After the import process, we can run all tactics at the same time, or we can run them by giving a tactic id.
We can simulate the T1033 tactic using the “Invoke-AtomicTest T1033 -TestNumbers 1,2 (1,2 here means signed binary proxy execution)” command. We can see from the output that the command worked successfully. This tactical ID aligns with the “Discovery” category in the Mitre Framework. Essentially, we’ve conducted a discovery for users in Active Directory. In this discovery output, we can observe all users on the domain, including tickets. Let’s analyze this tactic in Splunk.

When we open the “ThreatHunting” App in the Splunk interface, we can spot the simulated Mitre ID on the left side. Splunk swiftly analyzes the incoming logs and confirms that the attack matches the T1033 Mitre ID. Let’s delve into the log in detail.
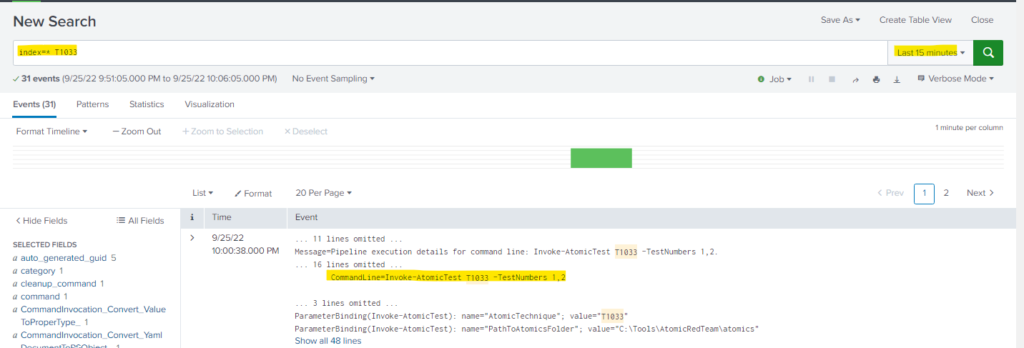
After ThreatHunting detects the discovery, let’s perform a search using this Mitre ID. Upon reviewing the search result, Splunk has captured the “Invoke-AtomicTest T1033 -TestNumbers 1,2” command we executed to simulate. This log is promptly analyzed and categorized in the ThreatHunting app and presented to us.
Let’s proceed with another tactic
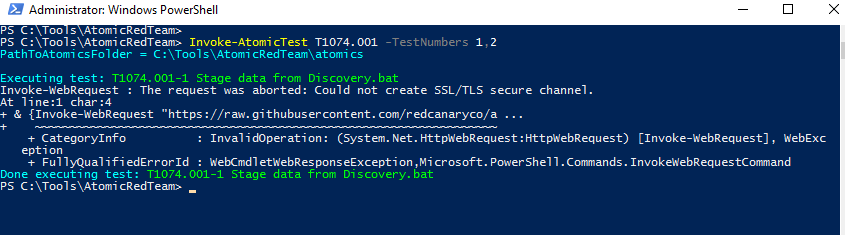
The T1074 tactic falls under the Collection category in the Mitre Framework. Also known as Data Staged, this tactic involves preparing collected data in a central location or directories on the local system before exfiltration. After executing the tactic with the same command, we encounter a warning indicating that the data is in the “Discovery.bat” script. Let’s explore this situation in Splunk.
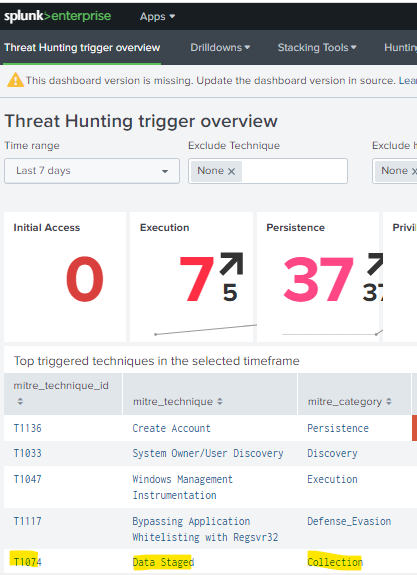
Once again, browsing the ThreatHunting app, we can observe the “T1074” Mitre technique. The attack is categorized as “Collection”. Clicking on the technique, Splunk displays the captured log in detail.

When we navigate to the “Drilldowns” tab of ThreatHunting and examine the log, we ascertain that the command was executed by the “vagrant” user and operated on the “PowerShell” path. Such attacks can be viewed on the dashboard, enabling the creation of alarms for swift intervention.
PurpleSharp, an open-source attack tool written in C#, executes attacker techniques in Windows Active Directory environments. Leveraging the Mitre ATT&CK framework, PurpleSharp executes different techniques throughout the attack lifecycle.
Let’s continue attack simulations with PurpleSharp.
In today’s post we’ll explain how to simulate Active Directory attacks using Splunk and various tools to improve an organization’s security posture.
In PurpleSharp, playbooks are employed for attack simulations, featuring technique IDs. These techniques can be edited, added, or removed as desired. Ready-made playbooks can also be downloaded from Git Hub.
We’ve added the “variations.pb” file downloaded from this link to the purplesharp folder. This playbook encompasses the T1136 technique. This Mitre ID outlines the steps for attackers to create accounts to maintain access to target systems. With a sufficient level of access, the creation of such accounts is utilized to establish secondary credentialed access without deploying permanent remote access tools on the system.
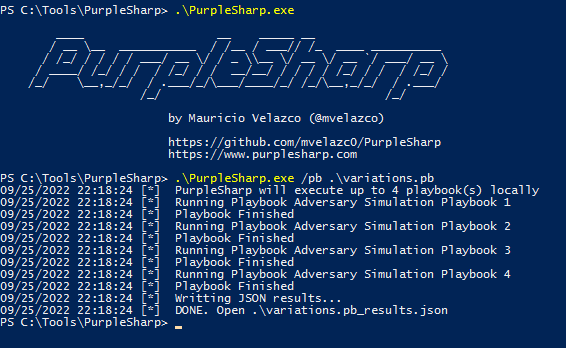
We can initiate the attack with the command “/pb .\variations.pb” in PurpleSharp.exe. Let’s see what transpired in Splunk after the attack concluded.
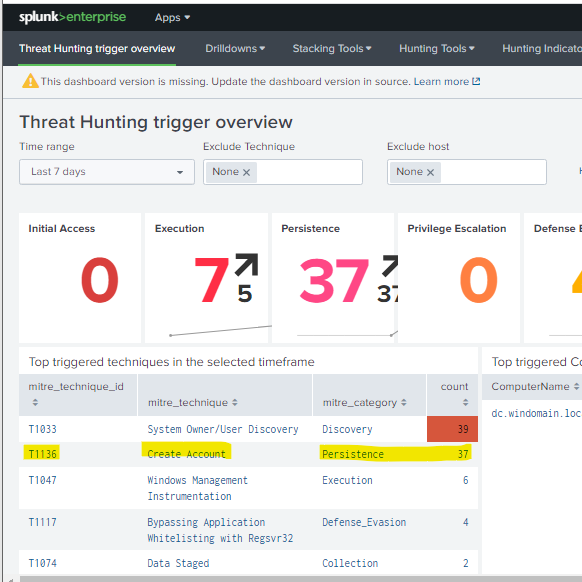
After running the Playbook, ThreatHunting captured 37 Persistence logs. We observe that the technique with T1136 Mitre Id falls under the Persistence category. Reviewing the log details;
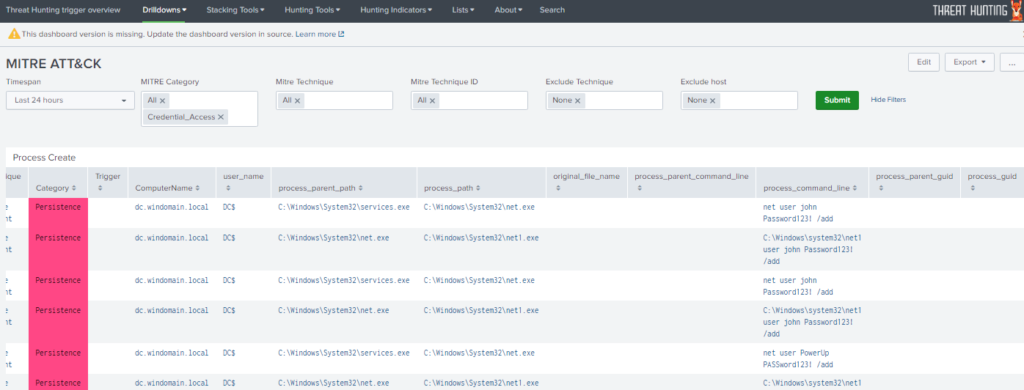
In the “process_command_line” field, we discern the commands used after the Playbook run. Here, numerous user creation processes and user password assignment processes were detected. Splunk captured the log at this juncture and categorized it correctly according to the Mitre ID.
Finally, let’s employ the Mimikatz tool. On a compromised Windows system, user passwords stored in the system memory can be retrieved using mimikatz commands.

In today’s post we’ll explain how to simulate Active Directory attacks using Splunk and various tools to improve an organization’s security posture.
With the provided commands, users’ passwords can be explicitly dumped. Mimikatz isn’t solely utilized on compromised Windows systems. Following successful password retrieval, we can analyze Splunk.
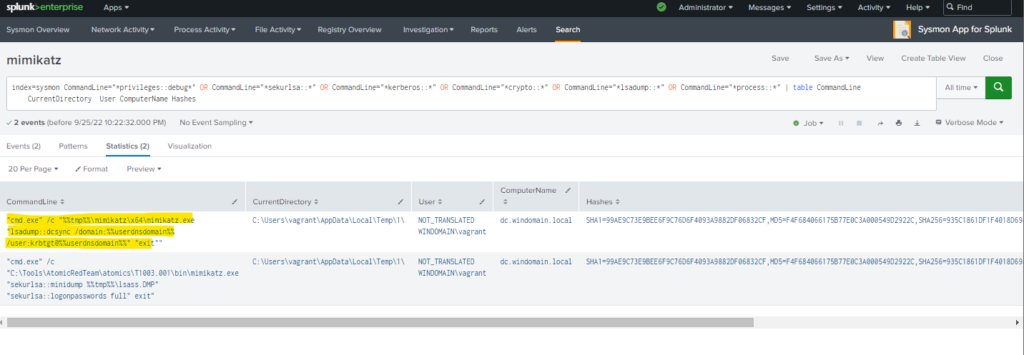
This time, after conducting a search to detect the mimikatz tool in the Sysmon App, we observe mimikatz movements in detailed fashion. Thus, after identifying the attack, swift intervention can be executed, and necessary actions taken.
In conclusion, to take appropriate actions within our Splunk structure or determine which rules need to be set for specific situations, we can leverage the attack simulation tools mentioned to anticipate the log types that might await us in the event of a potential anomaly. This facilitates the creation of a roadmap for detecting expected logs or configuring correlations by associating them with different events.
While each product boasts its own capabilities and functionality levels, the critical aspect is questioning whether other tools can enhance the product’s functionality. Does the product allow for this? Such questioning is pivotal. Splunk stands with the user in this regard, showcasing its capabilities and presenting us with apps in which it will be a stakeholder in the actions that can be developed.
Throughout this blog, we aimed to demonstrate the benefits of simulating some attacks. By simulating attacks and analyzing the logs in Splunk, you can identify potential weaknesses in your defenses and take steps to remediate them before a real attack occurs.
We recommend experiencing the Threat Hunting and Sysmon App, which offer numerous diverse, customizable features.
Stay tuned for more blog posts on netsmartsecurity.nl


The rise of quantum computing introduces significant challenges to existing cryptographic systems.
In today’s post we’ll explain how to simulate Active Directory attacks using Splunk and various tools to improve an organization’s security posture.

In this blog post, we will cut through the confusion and explain the core differences between SIEM and SOAR, two essential security tools used to protect your organization.

The privileged accounts of organizations play an important role in today’s cybersecurity ecosystem. Protecting these accounts and the critical resources they access has become crucial for organizations to manage, control, and audit all privileged account activities.